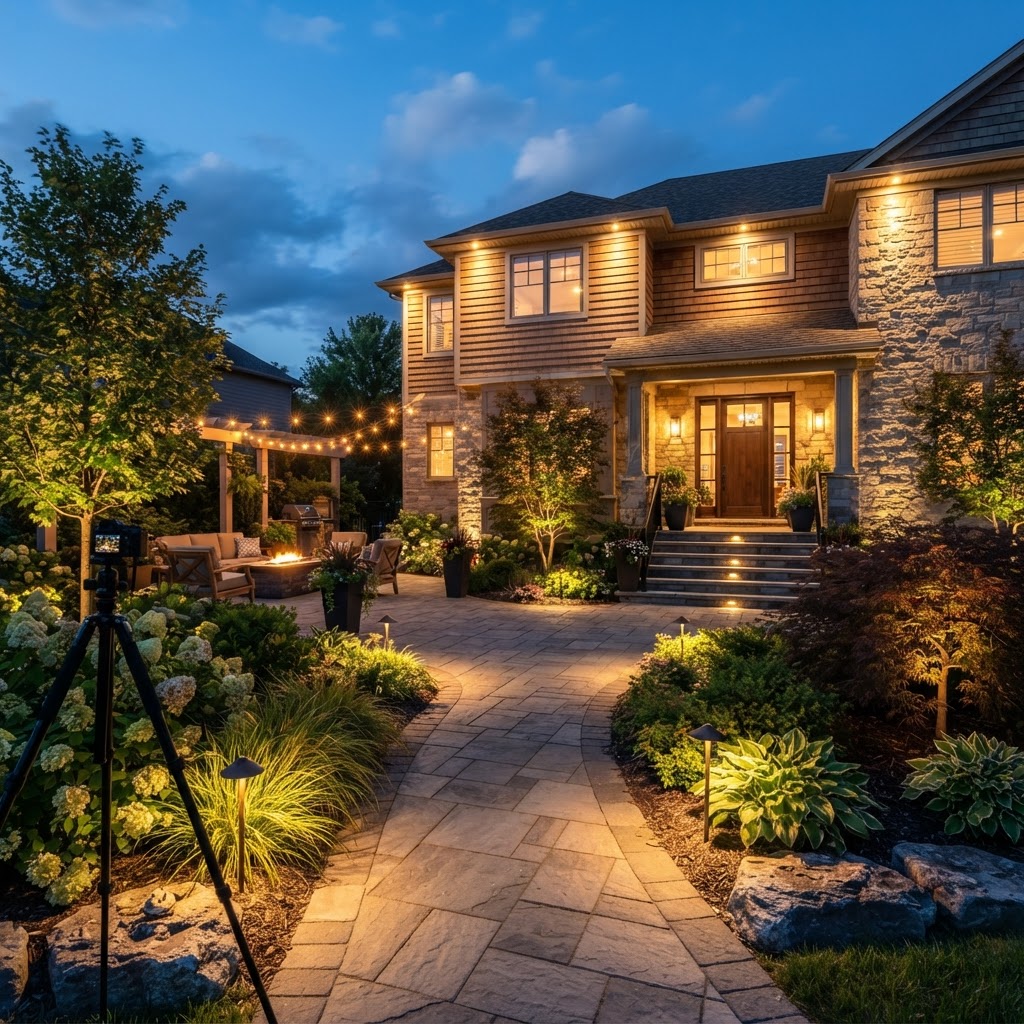
When darkness falls, does your home fade quietly into the shadows, or does it transform into an inviting, warm retreat that highlights your favorite architectural textures and lush garden beds? Landscape lighting design is an art form rooted in subtlety, balance, and intentional contrast. Far beyond simply stringing up solar stakes or mounting a single blinding floodlight over the garage, a thoughtfully planned lighting scheme extends your living area into the evening, deters unwanted visitors, and dramatically boosts your home's curb appeal. In this guide, we will unpack how professional designers craft balanced nighttime landscapes—from selecting ideal color temperatures and beam spreads to avoiding common pitfalls like blinding glare and voltage drop.
The Core Philosophy: Reveal Rather Than Flood
The single biggest mistake amateur designers make is attempting to recreate daylight. When outdoor lighting tries to illuminate everything at once, the yard ends up looking less like an elegant sanctuary and more like a commercial parking lot. Sophisticated landscape lighting design operates on the golden rule of exterior illumination: reveal rather than flood.
Instead of washing wide zones in uniform brightness, professional landscape architects work with contrast, visual depth, and strategic shadow. Darkness is not an obstacle to eliminate; it is the canvas that allows selected trees, textured stonework, and tranquil water features to stand out. When aiming fixtures, the fixture itself and the direct light source should generally remain hidden from typical vantage points. Observers should see the illuminated subject—such as the textured trunk of a Japanese maple or the soft wash on a masonry wall—rather than stare into an exposed bulb.
To ensure high efficiency and long lamp life, look for fixtures certified by Energy Star. High-quality low-voltage LED systems consume up to 80% less energy than outdated halogen fixtures, operate at cooler temperatures, and allow you to power multiple outdoor fixtures on a single residential circuit without straining your utility bill.
Layering Light: Ambient, Task, and Accent
Just as interior designers layer overhead chandeliers, task lamps, and wall sconces inside the home, an outdoor lighting scheme relies on three distinct layers working in harmony:
- Ambient Lighting (General Illumination): This layer establishes safe baseline navigation throughout the property. It includes soft perimeter illumination, post caps on decks, gentle downlights hidden high in mature tree canopies (often called 'moonlighting'), and understated wall washes.
- Task Lighting (Function and Safety): Task fixtures ensure people can safely maneuver around functional exterior zones. This includes step lights recessed into stair risers, path lights along twisting walkways, and practical barbecue or outdoor kitchen fixtures. Path lights should be spaced staggered along walking borders rather than lined up in rigid, parallel runway tracks.
- Accent Lighting (Visual Drama): Accent lights direct attention toward specific focal points, such as sculptural garden art, specimen plantings, water fountains, or distinctive architectural pillars. Narrow-beam spotlights and in-ground well lights shine brightest here, carving out visual anchors in the dark.
If you're tackling outdoor upgrades as part of an overarching property overhaul, review our essential home maintenance guide to coordinate electrical runs with seasonal landscaping tasks and irrigation maintenance.
Essential Outdoor Lighting Techniques to Know
Professional lighting pros use a specialized toolkit of techniques to accentuate outdoor features. Choosing the proper technique depends entirely on what you want to feature:
- Uplighting: Placing a fixture at the base of an architectural column or a deciduous tree and aiming upward creates dramatic height and accentuates branching structure.
- Moonlighting (Downlighting): Mounting a soft fixture 15 to 25 feet up within the branches of a mature tree cast downwards through the limbs creates organic, moving shadows across patios and turf, mimicking natural moonlight.
- Wall Grazing: Placing an uplight just 6 to 12 inches away from a rustic stone or brick facade and aiming steeply upward casts deep, expressive shadows across the rough masonry surfaces.
- Silhouetting: Concealing an uplight or wall wash behind an ornamental shrub or tree pointing toward a blank architectural wall creates an eye-catching dark silhouette of the plant against a lit backdrop.
- Cross-Lighting: Illuminating an ornamental boulder, fountain, or sculpture from two opposing angles eliminates harsh one-sided shadows, rendering the object in three full dimensions.
Color Temperature and Beam Angles: The Details That Matter
Two technical elements dictate whether a landscape lighting setup looks welcoming or institutional: Kelvin color temperature and optical beam spread.
Color Temperature: Stick within the warm 2700K to 3000K range for residential applications. A 2700K lamp produces a warm, amber-tinted glow that complements cedar siding, natural flagstone, and warm architectural elements. A 3000K lamp provides a clean, neutral warm-white tone that looks vibrant against green foliage and floral plantings. Avoid bulbs rated at 4000K or 5000K; these cooler temperatures produce a cold, bluish hue that feels commercial and can disrupt natural nocturnal rhythms.
Beam Angles: Matching the fixture's optical spread to the subject's dimensions prevents overspill and harsh hotspots:
- 15° Spot: Perfect for narrow architectural pillars, flagpoles, and chimney flues.
- 35° to 45° Flood: Ideal for multi-stem trees, garden beds, and mid-sized entryways.
- 60° Wide Flood: Recommended for wide canopy trees, fence runs, and broad retaining walls.
Low-Voltage Mechanics: Sizing Transformers and Wiring
Nearly all modern residential landscape systems use 12-volt low-voltage direct current (DC) or alternating current (AC). Low-voltage lines present minimal shock hazards and require shallow trenching—usually buried 6 inches into garden beds and 12 inches beneath turf, compared to the deep trenching required by line-voltage (120V) runs.
Calculating Transformer Capacity: Sum the wattage of all individual fixtures planned for your layout, then multiply that total by 1.25 to leave a 25% safety overhead. For instance, if you operate twelve 5-watt LED landscape fixtures (60 watts total), multiplying by 1.25 gives 75 watts. A standard 100W or 150W low-voltage transformer plugged into an exterior GFCI receptacle will comfortably run this circuit with room for future expansion.
Mitigating Voltage Drop: Over extended wire runs, electrical resistance causes voltage to drop, leading to dim lamps at the end of the line. Use thick 12-gauge or 10-gauge direct-burial landscape wire for runs exceeding 75 to 100 feet, and establish hub or split-tee wiring configurations rather than running one continuous daisy chain. Always protect splices using silicone-filled, watertight wire nuts or heat-shrink gel connectors to eliminate ground-water corrosion.
Complex installations involving dedicated outdoor subpanels, masonry coring, or integrated patio step lighting are often best handled by licensed electrical contractors. Through FIND-A-PRO, you can quickly connect with pre-screened, verified local electricians and landscape lighting specialists who understand regional codes and frost depths. If you are comparing bids, check out our guide on how to hire a service professional to ask the right questions about warranty coverage and proof of insurance.
Common Landscape Lighting Mistakes to Avoid
Steer clear of these frequent DIY landscape pitfalls to ensure your property remains tasteful and functional:
- Airport Runway Syndrome: Installing matching path lights directly opposite each other along both sides of a walkway creates a landing-strip effect. Instead, stagger them organically on alternating sides, spacing them 6 to 10 feet apart.
- Unshielded Glare: Fixtures that point light directly into the eyes of pedestrians or oncoming street traffic create dangerous blinding glare. Always choose shrouded fixtures with glare shields and hex louvers.
- Ignoring Lighting Zones: Putting all exterior lights on one mechanical switch makes flexibility impossible. Group your layout into distinct zones (e.g., pathway safety lights, patio entertainment accents, and architectural uplighting) controlled by smart timers or astronomical photocells.
- Cheap Materials: Plastic composite or thin aluminum fixtures quickly fade, crack, and corrode after exposure to sun, rain, and string trimmers. Invest in cast brass or copper fixtures that age with a graceful patina.
Frequently Asked Questions About Landscape Lighting Design
Q: How much does professional landscape lighting design cost?
A: A professionally designed and installed low-voltage system typically ranges between $2,000 and $6,000 for an average residential property, covering 10 to 20 cast-brass LED fixtures, a heavy-duty transformer, direct-burial cable, and expert placement. DIY kits can cost under $800, though they often use lower-grade materials.
Q: What is Dark Sky compliance in landscape lighting?
A: Dark Sky compliant lighting minimizes light pollution, glare, and upward skyglow. Compliant fixtures feature full-cutoff shrouds that direct all light downward toward the ground, protecting nocturnal ecosystems and allowing stargazers to enjoy clear night skies.
Q: How do I maintain my landscape lighting system?
A: Inspect your system semi-annually. Clear away accumulated mulch, fallen leaves, and dirt from fixture lenses. Trim back rapidly growing plant material that might block beams, check wire splices for exposed copper, and adjust fixture angles that may have shifted during lawn mowing or winter snow removal.
Key Takeaways
A well-executed landscape lighting design transforms your home's exterior, unlocking a dynamic nighttime personality while improving nighttime security and everyday navigation. By adhering to the core principle of revealing texture rather than flooding spaces, selecting warm color temperatures, and opting for durable fixtures, you can build an outdoor illumination plan that delivers lasting enjoyment. Ready to elevate your outdoor living spaces with expert craftsmanship? Turn to FIND-A-PRO to discover top-rated, certified landscape lighting designers and electrical professionals in your neighborhood today.